
In fall 2023, the EU has deemed Google as a gatekeeper in the digital space under the Digital Markets Act (DMA), placing it under heightened legal scrutiny. In response to this assessment and to meet the DMA enforcement deadline in March 2024, Google is adjusting its advertising solutions. One aspect of this change is the latest update to Google Consent Mode. Starting in March 2024, Consent Mode will become mandatory for all advertisers operating in the EEA and wanting to use all of Google’s GMP advertising features. This shift, which includes phasing out certain features in the remaining UA360 properties while at the same time providing insufficient documentation on the new feature’s functionality and behavior, left the community with a lot of open questions.
This blog post is the product of me penning down my observations and combining them with the ones from my peers in the industry to contribute to a better understanding of Google’s Consent Mode v2 and its impact on data collection. Overall, the aim is to provide readers (and me as the author) with a comprehensive overview of Consent Mode v2 and help them make informed decisions about their website’s privacy and data practices by unveiling the technical intricacies.
This blog post can be seen as the technical counterpart of my previous thoughts on Consent Mode v2 published on the IIH Nordic blog. If you are new to the topic, I recommend reading the previous blog post first to get a better understanding of the topic’s context and the implications of Consent Mode v2.
Introduction to Consent Mode v2
Google’s Consent Mode v2 becomes mandatory on March 6, 2024, for all advertisers targeting the European Economic Area (EEA), including the UK. Implementing this update is essential for maintaining access to the Google Marketing Platform’s (GMP) remarketing and targeting functionalities, regardless of the company’s location, as long as it engages EEA users. The general idea of Consent Mode is to signal user consent states (granted vs. denied) for various consent types to Google tools and generate data through additional signals (so-called pings) even in the absence of user consent.
The following consent types are supported by Consent Mode v2:
| Consent Type | Description |
|---|---|
ad_storage |
Enables storage, such as cookies (web) or device identifiers (apps), related to advertising |
ad_user_data |
New in v2: Sets consent for sending user data to Google for online advertising purposes. (Will be inferred from ad_storage ) |
ad_personalization |
New in v2: Sets consent for personalized advertising |
analytics_storage |
Enables storage, such as cookies (web) or device identifiers (apps), related to analytics, for example, visit duration |
functionality_storage |
Enables storage that supports the functionality of the website or app, for example, language settings |
personalization_storage |
Enables storage related to personalization, for example, video recommendations |
security_storage |
Enables storage related to security such as authentication functionality, fraud prevention, and other user protection |
The collected signals and additional data points aid in modeling conversions (e.g., for Google Ads and Floodlight) and tracking and modeling user behavior and conversions (for GA4). Consent Mode allows for (limited) data capture in line with user consent preferences through two variants: ‘Basic’ and ‘Advanced.’ The ‘Basic’ variant is the future minimum requirement for advertisers, whereas the ‘Advanced’ mode allows for fuller use of Google’s data modeling capabilities. The ‘Advanced’ variant enables data collection on websites through more or less complete requests, but without cookies, whenever consent is not given or explicitly denied. The aim is to fill data collection gaps and to provide advertisers with a more complete, modeled picture of their users’ behavior. These two options have been available since the initial release of Consent Mode. However, with the latest update, Google increased the focus on their availability.
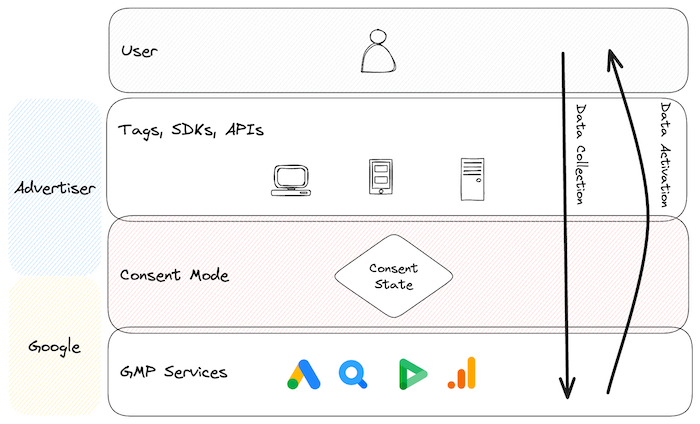
Source: Own Visualization
Moreover, with Consent Mode v2, two new consent states have been introduced: ad_user_data and ad_personalization. These two new consent states allow for more granular control over what data is collected and how the data is processed and shared between interconnected GMP tools, like GA, Google Ads, etc. The new consent states highly aim to control the data activation processes. In that sense, Consent Mode v2 increasingly becomes a control layer for advertisers for all data collection (ad_storage & analytics_storage) and activation mechanisms (ad_user_data & ad_personalization) in the GMP. This is an aspect that is often overlooked when discussing Consent Mode v2. Traditionally, the focus is very much on the data collection aspect for websites, but Consent Mode v2 is much more than that.
Basic Implementation
When a user lands on a website or uses an app for the first time, the advertiser blocks Google tags and SDKs by default. At this point, the advertiser shares no user data with Google. As we know, the page then presents the user with a consent banner. The user can grant or deny tracking consent (if the setup is correctly implemented…).
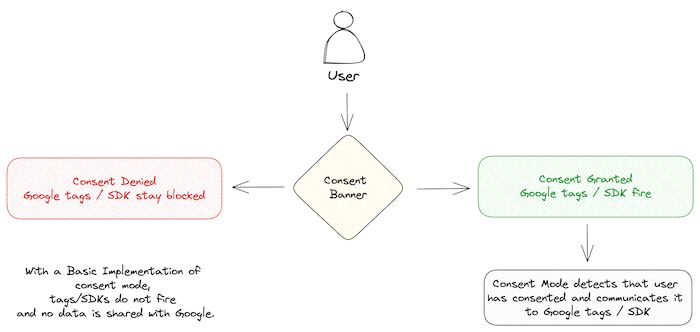
Source: Own Visualization of Google source
Should the user withhold consent, no tracking occurs, no tags are fired, and Google does not receive any data from the user.
Conversely, if the user agrees and provides consent, the advertiser updates the consent states for Consent Mode and conveys it to the Google tags/SDK. This action effectively lifts the blockade, allowing the tags and SDKs to function as intended (=using cookies).
This is most likely the implementation that most advertisers have implemented, as it is the easiest and least “risky” from a legal perspective. However, it also comes with the most significant drawback, as it only allows for data collection in the presence of consent. Advertisers that do not collect data for unconsented users will naturally experience a less complete picture of their user’s behavior.
Advanced Implementation
Advanced Consent Mode operates under a paradigm where advertisers do not entirely block Google tags and SDKs without user consent. Unlike the Basic Implementation, where consent is a prerequisite for data processing, the Advanced Mode proceeds with data collection regardless of consent. Still, it does not use any cookies in that case.
When users deny consent, the Advanced Mode employs “cookieless pings”. These are regular events/hits sent to Google’s servers but do not incorporate regular cookie values. Cookieless pings then allow Google to use these for modeling granular and aggregated data for analytics (Behavioral Modeling) and advertisement performance purposes (Conversion Modeling).
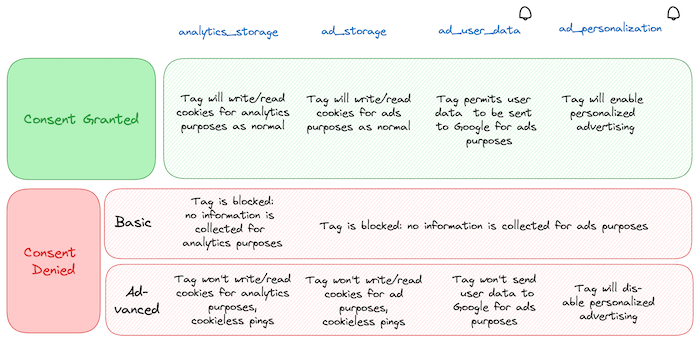
Source: Own Visualization of Google source
The advertiser communicates their users’ consent states to Google, which determines how Google processes, exposes and uses the data. From the table above, the reader can infer the exact implication of each consent state on the tags’ data collection behavior.
The general idea of the Advanced Consent Mode is that even when cookies are not permissible, advertisers can obtain valuable insights in a privacy-conscious manner.
Basic vs. Advanced Implementation
To summarize, the Basic Implementation ensures that no data is collected without consent and utilizes cookies once consent is granted. The Advanced Implementation, on the other hand, additionally allows for data collection without consent, but without cookies in that case. Advanced Implementation is the only way to collect data that feeds Google’s embedded models without consent.
Here are the tradeoffs between advanced and basic implementation for consent mode:
| Advanced Implementation | Basic Implementation | |
|---|---|---|
| Tag Behavior | Google tags are loaded before the consent dialog appears. Tags send cookieless pings when cookie consent is declined. |
Google tags are blocked until consent is granted. |
| Behavioral Modeling in GA4 | yes | no |
| Conversion Modeling in GA4 | yes | yes* |
| Conversion Modeling in Google Ads | yes | yes* |
* When tags are blocked due to consent choices, no data is collected, and conversion modeling in Ads is based on a general model. The modes use features such as browser type, conversion action type, time of day, and other high-level, non-identofying variables. This model is less accurate than the model used when tags are unblocked, but it is more accurate than not using a model at all.
Source: Advanced vs. basic implementation
DISCLAIMER: While advertisers should adopt the Consent Mode update to ensure remarketing efforts stay efficient, they should not take the choice of whether or not to implement the “Advanced” variant lightly. The “Advanced” mode allows for more data collection, which may benefit campaign performance. However, it might also come with a higher risk of non-compliance with legislation like ePrivacy, which could result in fines and other penalties. Hence, I strongly advocate involving your legal department in deciding on the abovementioned trade-off.
Implications of Adopting Consent Mode v2
With the two additional consent states — ad_user_data and ad_personalization — Consent Mode v2 allows for enhanced user consent granularity and gives advertisers tools to directly affect how Google services can utilize collected data.
The ad_user_data consent state governs whether advertisers can send user data to Google for advertising purposes. Denial of this consent has the following implications:
- User ID Collection: If
ad_user_dataconsent is denied, no user-specific identifiers are collected or processed. This restriction negatively impacts the ability of advertisers to measure cross-device user interactions. - Enhanced Conversions: Denying consent for
ad_user_datameans that Enhanced Conversions, which rely on (hashed) first-party data (1PD), will not be processed in Google Ads and GA4. This limitation hinders the ability to track users’ post-ad interactions, potentially leading to less efficient ad performance measurement and ad spending. - GA4 Conversion Export: Additionally, the export of GA4 conversions to the GMP will cease to function without
ad_user_dataconsent, disrupting the flow of conversion data used for broader marketing analysis and campaign adjustments.
The ad_personalization consent state, on the other hand, controls the allowance for personalized advertising:
- Remarketing Capabilities: With
ad_personalizationset to denied, the user will not enter any potential remarketing lists. - GMP Personalized Advertising: Using GMP tools for personalized advertising also becomes impossible without consent for
ad_personalization. This restriction can significantly reduce the effectiveness of ad campaigns targeted based on user preferences and behaviors.
The above functionality also explains why Google explicitly added these two new consent states to the remaining data collection mechanisms – APIs and Measurement Protocol. Advertisers can use these methods to enable remarketing use cases (e.g., Customer Match via API upload) or send offline conversions with 1PD (e.g., Enhanced Conversions for Leads). Hence, advertisers must also send users’ consent signals for these data points to ensure a comprehensively designed system from Google’s perspective.
Implementation of Consent Mode v2
For those who have previously integrated the previous version of Consent Mode and consciously decided whether to use Basic or Advanced, transitioning to v2 is a straightforward process that involves updating the existing configurations to recognize and handle the two new consent states.
At the core of Consent Mode are two key commands that govern user consent states:
Default Command: This sets the initial consent state, which comes into play before a user has made their consent choices known. Establishing this state immediately upon every page load is the important thing here.Update Command: This command is used to revise the consent state once the user has made their choices clear. It ensures the user’s consent preferences are captured and applied consistently to all applicable tags throughout browsing.
To accurately implement these commands, it’s best to adhere to the protocols provided by your Consent Management Platform (CMP). Many CMPs offer step-by-step guides for integrating Consent Mode v2, which typically involve gtag.js and Google Tag Manager (GTM) Sandbox APIs, preferably via template configurations. Advertisers should consult their CMP’s documentation to ensure a smooth integration process.
Using gtag.js (web)
The Google tag (gtag.js) is a JavaScript tagging framework and API that allows you to send event data to Google Analytics, Google Ads, and other GMP tools. The gtag.js tagging library uses the global gtag() function to send data to Google’s servers. The gtag.js library supports Consent Mode v2 natively and allows for implementing the two key commands mentioned above.
Set default consent state
Ideally, the default consent state is called on every page on your site and set before any other consent mode commands (or other Google tag execution). This ensures that the default consent state is applied to all subsequent gtag.js commands. Furthermore, the default consent state is applied to all subsequent gtag.js commands until the consent state is updated. The consent state values in this article are only examples and should match your organization’s policy for your specific implementation.
window.gtag("consent", "default", {
  analytics_storage: "denied",
  ad_storage: "denied",
  ad_user_data: "denied",
  ad_personalization: "denied",
  wait_for_update: 500, // Optional. A millisecond value to control how long to wait before data is sent by any Google tags
  region: ["ES", "DE"], // Optional. A region value to fine-tune defaults based on your users' geographic locations. See Geographical IDs for more information on identifying regions.
});
By specifying regions in the consent command, you can limit the default behavior of your tags to the specified locations, ensuring compliance with regional data protection regulations. For more nuanced control based on user location, delve into the Geographical IDs documentation to enhance your site’s regional specificity in consent management. For those employing an asynchronous CMP, the wait_for_update parameter is a valuable tool that dictates the latency before Google tags send out data, allowing the consent state to be updated. This parameter is unnecessary for synchronous platforms, where consent determination occurs instantaneously.
Update consent state
As users navigate a website, they may alter their consent preferences. The Consent Mode implementation should respond to these interactions by utilizing the update command to modify the consent status as soon as possible. Maintaining the user’s choice throughout their session is equally vital upon obtaining consent. Ensure the update command is invoked on subsequent pages to reflect their current consent status accurately.
And remember, it is only necessary to issue updates when there is an actual change in the user’s consent status. Most CMPs will automatically issue an update command on every page once the user has made a consent decision.
window.gtag("consent", "update", {
  analytics_storage: "granted",
  ad_storage: "denied",
  ad_user_data: "denied",
  ad_personalization: "denied",
});
Set url passthrough
The url_passthrough setting in the Consent Mode framework aims to improve the accuracy of conversion tracking by enabling the passing of ad-related information through URL query parameters.
gtag("set", "url_passthrough", true);Note: This command is usually added to the default snippet before any
gtag('config',...)commands.
This feature becomes relevant when a user’s consent settings prevent the storage of ad-related data (ad_storage: denied). Instead of relying on first-party cookies, which usually capture details from ad clicks, URL passthrough ensures this information is carried across pages until a conversion occurs within the URL. Hence, this method unlocks the measurement of ad click efficacy.
For URL passthrough to function, several prerequisites must be satisfied:
- The navigational link must lead to the same domain.
- A Google Click Identifier (GCLID) or DoubleClick Click Identifier (DCLID) must be present in the URL.
When the advertiser’s implementation meets these conditions, URL passthrough is a (not so robust) alternative to traditional cookies.
Obtain current consent state
To quickly ascertain the current consent state for any consent type, you can utilize the getConsentState method from the Google tag’s global object. Executing the following will return a binary value: 0 indicates no consent (denied), and 1 signifies consent has been granted:
window.google_tag_data.ics.getConsentState("ad_storage"); // Example for ad_storageThis provides a quick and efficient means of checking user consent in real-time using the pre-defined APIs.
Listen for consent state changes
To monitor and respond to changes in user consent for ads and analytics, you can set up a listener using the addListener method of the Google tag’s object:
window.google_tag_data.ics.addListener(
  ["ad_storage", "analytics_storage"],
  function (event) {
    console.log("Consent state for either ads or analytics changed:", event);
  }
);
The above code snippet adds a listener for consent states for ad_storage and analytics_storage. When a change occurs in either consent state, the callback function is executed, logging a message and the event details to the console. This enables real-time tracking and reaction capabilities of user consent preferences within your website or application.
Using Google Tag Manager Sandbox APIs (web)
Google also included the gtag API functionalities for Consent Mode into GTM’s Sandbox APIs, making it possible to build and use native community tags and variable templates in our GTM containers.
Consider using Simo Ahava’s template for a streamlined implementation of Consent Mode v2. Available here, this template is ideally suited to orchestrate the Consent Mode implementation.
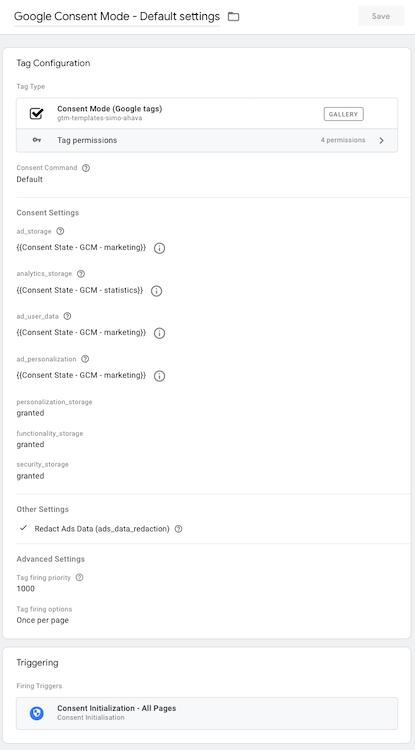
Source: Own GTM Setup
Below, we have a closer look into the specific methods employed by this template or similar ones, which are examples of their utilization. For more technical details on the APIs, see here.
Set default consent state
By invoking the setDefaultConsentState method from a tag template, the default consent state is pushed to the data layer. GTM processes this update immediately after the current event, and any tags triggered by it have finished processing or when the tag processing timeout is reached, whichever comes first. The implementation ensures that the consent update is prioritized and processed in the GTM container before other items are queued in the data layer. This approach guarantees that user consent preferences are accurately reflected and adhered to across all subsequent tag executions.
const setDefaultConsentState = require("setDefaultConsentState");

setDefaultConsentState({
  ad_storage: "denied",
  ad_user_data: "denied",
  ad_personalization: "denied",
  analytics_storage: "denied",
  functionality_storage: "granted",
  personalization_storage: "granted",
  security_storage: "granted",
  wait_for_update: 500, // optional
  region: ["DE", "US"], // optional
});
This prioritization is critical to remember, as this command allows you to bypass the command queue, which, i.e., the gtag API is subject to. So, if you want to use Consent Mode with GTM, I recommend using a GTM template utilizing the respective Sandbox APIs.
Including optional parameters like wait_for_update and region offers additional flexibility, allowing for fine-tuned control based on specific timing needs and geographic considerations. These parameters are optional and work as described for the gtag API.
Update consent state
The updateConsentState function allows for dynamic updating of consent states across various categories. The values for these categories can be dynamically populated, for instance, using variables that reflect the user’s choices as recorded by the CMP.
const updateConsentState = require("updateConsentState");

updateConsentState({
  ad_storage: "granted", // Can be dynamically populated. E.g., using a variable
  ad_user_data: "granted",
  ad_personalization: "granted",
  analytics_storage: "granted",
  functionality_storage: "granted",
  personalization_storage: "granted",
  security_storage: "granted",
});
Similar to the setDefaultConsentState, this function pushes a gtag set command to the data layer and guarantees that the updated consent state is recognized and acted upon in the GTM container before processing any other items in the data layer queue.
Set url passthrough and ads_data_redaction
The previously mentioned gtag('set',...)commands, like ads_data_redaction or url_passthrough are available as well, allowing for the same functionality as the gtag API. Developers can use the gtagSet function in custom GTM templates to implement these commands.
const gtagSet = require("gtagSet");
gtagSet("ads_data_redaction", true);
gtagSet("url_passthrough", true);
Listen for consent state changes
The addConsentListener function registers a listener that triggers whenever there’s a change in the consent status of a specified type (e.g., analytics_storage), such as shifting from “denied” to “granted” or vice versa. However, it’s important to note that this function does not activate if a previously unset consent type is updated to “granted”, as an unset state is already considered as “granted”.
const isConsentGranted = require("isConsentGranted");
const addConsentListener = require("addConsentListener");

if (!isConsentGranted("ad_storage")) {
  let wasCalled = false;
  addConsentListener("ad_storage", (consentType, granted) = {
    if (wasCalled) return;
    wasCalled = true;

    const cookies = getMyCookies();
    sendFullPixel(cookies);
  });
}
Additionally, the isConsentGranted function returns “true” if a particular consent type is deemed granted. This status is achieved either when the consent type is explicitly set to ‘granted’ or when it remains unset. Any other setting for the consent type is interpreted as not granted.
Combining these two functions allows for the creation of a listener that triggers when a particular consent type is granted. This is useful for implementing a fallback mechanism for when a user grants consent for a specific type of consent.
Using Firebase SDK (app)
The Firebase Analytics SDK library enables you to collect behavioral data from your app for GA4. The Firebase SDK natively supports Consent Mode v2 and allows for implementing the two critical commands mentioned before. Regardless, adopting Consent Mode v2 in your app is probably the biggest challenge in the migration process, as very few companies have implemented it so far. But as of March 6th, 2024, it will be mandatory for all advertisers targeting EEA users and wanting to use all GMP functionalities – also for app tracking.
Set default consent state
As for the web, when integrating the Firebase SDK for app development, configuring the default consent state is crucial for managing user privacy preferences. Out of the box, the app does not establish any consent mode values within an application. Access your app’s info.plist file to set these defaults. Within this file, the app developer introduces consent mode key-value pairs, where each key represents a specific type of consent, and the value indicates the consent state—true for granted consent and false for denied.
To exemplify, if you aim to deny consent by default for all parameters, your info.plist should include entries like the following:
<keyGOOGLE_ANALYTICS_DEFAULT_ALLOW_ANALYTICS_STORAGE</key <denied/
<keyGOOGLE_ANALYTICS_DEFAULT_ALLOW_AD_STORAGE</key <denied/
<keyGOOGLE_ANALYTICS_DEFAULT_ALLOW_AD_USER_DATA</key <denied/
<keyGOOGLE_ANALYTICS_DEFAULT_ALLOW_AD_PERSONALIZATION_SIGNALS</key <denied/
Update consent
As we know, the users’ consent states must be updated after their consent decisions. This is achieved through the setConsent method within the Firebase SDK. When invoked, this method overwrites the default consent settings and ensures that the updated preferences are preserved across future app launches. These updated consent states remain active until setConsent is executed again, ensuring that changes in user preferences are respected, even if the app is closed and later reopened. setConsent allows for selective updates, affecting only the specified consent parameters – just like its gtag.js counterpart.
For instance, to update all consent values to “granted” status, developers can utilize the following Swift code snippet:
Analytics.setConsent([
  .analyticsStorage: .granted,
  .adStorage: .granted,
  .adUserData: .granted,
  .adPersonalization: .granted,
])
For more details on how to debug apps using Firebase Analytics, see here.
Measurement Protocol
The Measurement Protocol (MP) is a tool for sending event data directly to Google Analytics servers via HTTP requests, enabling enriching web and app interactions with server-side data.
With Consent Mode v2, the MP incorporates a consent attribute explicitly configuring consent types and states within each request. If specific consent parameters are not included in a request, GA4 will default to the consent settings established through online interactions associated with the same client ID or app instance. Hence, setting the attribute via the MP might not be as crucial as it is for websites and apps because it can be inferred from other events.
For example, when sending event data, such as a purchase event, you can specify consent states for data collection and processing through the MP. The following CURL command demonstrates how to include consent attributes for ad_user_data and ad_personalization within an event payload:
curl -X POST 'https://www.google-analytics.com/debug/mp/collect?api_secret=<your-key>&measurement_id=G-XXXXXX'
 -H 'Content-Type: application/json'
 -d '{
   "client_id": "709808103.1671720316",
   "events": [
     {
       "name": "purchase",
       "params": {
         "items": [
           {
             "item_id": "SKUTest1234",
             ...
           },

         ],
         "currency": "DKK",
         ...
         "ad_user_data": "granted",
         "ad_personalization": "denied"
       }
     }
   ]
}'
Google APIs
Lastly, let’s briefly look at Google’s APIs and how they are affected by Consent Mode v2. APIs are yet another way for advertisers to ingest data into Google’s system, helping them to enable remarketing use cases (e.g., Customer Match via API upload) or send offline conversions with 1PD (e.g., Enhanced Conversions for Leads). Hence, advertisers must also send users’ consent signals for these data points to ensure a comprehensively designed system from Google’s perspective.
For example, the Google Ads API introduced an update by incorporating the Consent object. This object is now a prerequisite for data uploads associated with call conversions, click conversions, Customer Match, and Store Sales, in line with how consent is managed within the remaining ecosystem. Advertisers must now explicitly set consent for each data interaction, as detailed below:
| Feature | Code change |
|---|---|
| Call Conversions | Set Consent for each call conversion event at CallConversion.consent. |
| Click Conversions | Set Consent for each click conversion event at ClickConversion.consent. |
| Customer Match | Set Consent for each Customer Match job at CustomerMatchUserListMetadata.consent. |
| Store Sales | Set Consent for each Store Sales event at UserData.consent. |
Source: Google Ads Developer Blog
This structured approach to consent within the Google Ads and other GMP APIs ensures that all data interactions (ideally) comply with user preferences. By integrating the Consent object across these features, Google provides advertisers with the tools to manage consent more effectively and forces them to think about whether or not the correct has been obtained to share this data.
Validating the Consent Mode v2 Implementation
Now that we have covered the implementation of Consent Mode v2, it is time to validate the setup. The following section provides a comprehensive overview of how to validate the Consent Mode v2 implementation using various methods and tools.
Using GTM Preview Mode
The GTM Preview Mode is a powerful tool for validating the Consent Mode v2 implementation. It allows you to inspect the consent state and the data layer, and to verify that the consent state is being updated correctly.
GTM Web Preview
When using the GTM Web Preview, you can inspect the consent state in the GTM interface. The consent state is displayed in the “Consent” tab of the GTM interface, and you can see the current consent state for each consent type. Overall, the interface gives you insight into the following for every recorded dataLayer event:
- On-page Default (inferred from default command)
- On-page Update (inferred from update command)
- Current State (consent state applicable to the current event and associated tags)
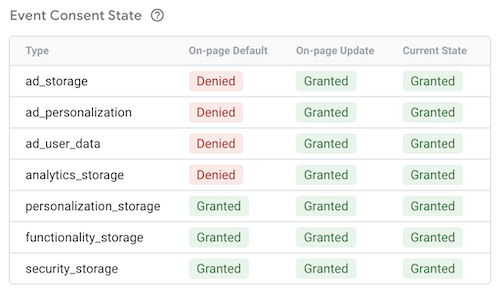
Source: Own GTM Setup
GTM Server-Side Preview
For the GTM Server-Side Preview, we are missing a user-friendly interface like the one for the web preview. However, we can inspect the consent state once the GA4 client parses the incoming event data. The event data exposes the consent states as part of the x-sst-system-properties object. From here, you can use the consent state to block or allow certain tags from firing based on the user’s consent preferences. Or pass the consent state to your tags for further analysis downstream.
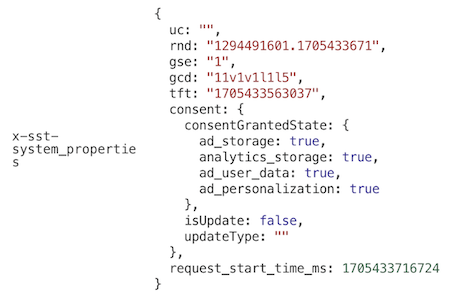
Source: Own GTM Setup
Using the dataLayer object
Since the gtag API eventually pushes all of its events and data to the data layer, you can also inspect the consent state directly in the data layer. This is especially useful when you want to validate the consent state without using GTM (e.g., plain JS) or when you want to verify that the consent state is being updated correctly using the browser’s console.
In the dataLayer, you can see the default and update commands and the respective consent states set for each type. This is a great way to verify that the consent state is being updated correctly and that the correct consent state is being applied to your tags.

Source: Own GTM Setup
This will only work if you have implemented the consent state using gtag.js. If you have used the GTM Sandbox APIs, you cannot inspect the consent state as described above.
Using the google_tag_data object
The first time that I saw the google_tag_data object was when I was reading Cookiebot blog post on Consent Mode v2. This global object is available on the page and contains information about the current consent state. You can use this object to listen for changes in the consent state and obtain the current consent state for each type.
Again, this is helpful if you want to use plain JS to validate the consent state and trigger or orchestrate other logic based on the user’s consent preferences.
google_tag_data.ics.entries
Using the google_tag_data.ics.entries object, you can inspect the current consent state for each consent type. This is a great way to verify that the consent state is being updated correctly and that the correct consent state is being applied to your tags. Using the following snippet, you can log the current consent state for each consent type nicely formatted to the console:
(() => {
  l = (s) => (s == undefined ? "" : s ? "granted" : "denied");
  c = (s) => (s == "granted" ? "color: #0C0" : "color: #C00");
  if (!"google_tag_data" in window) {
    console.log("No Consent Mode data found");
    return;
  }
  var g = google_tag_data.ics.entries,
    i = "",
    t = "",
    u = "";
  for (var a in g) {
    i = l(g[a]["default"]);
    u = l(g[a]["update"]);
    if (i == "" && u == "") continue;
    t =
      "t" +
      a +
      ":" +
      (i != "" ? "nttDefault: %c" + i : "%c") +
      "%c" +
      (u != "" ? "nttUpdate: %c" + u : "%c");
    console.log(t, i != "" ? c(i) : "", "", u != "" ? c(u) : "", "");
  }
  if (i == "") console.log("No default Consent settings found");
})();
Source: Cookiebot
The above snippet will print something like this to the console. Feel free to modify it as needed to suit your needs:

Source: Own GTM Setup
Using the Network Tab
As with every other part of the measurement setup, the Network tab is the source of truth when validating the Consent Mode v2 implementation. It allows you to inspect the requests and responses sent to and from Google’s servers – the data that is being dispatched by the browser -and verify that the consent state is being applied correctly to your tags.
gcs parameter
The gcsparameter has been around since Google Consent Mode v1 and is used to communicate the current consent state for ad_storage and analytics_storage to Google’s servers. So, the consent type signals to Google whether or not cookies have been used while obtaining the event data.
The gcs parameter is included in the requests sent to Google’s servers and contains the current consent state encoded in a binary format:
G1<ad_storage [0/1]><analytics_storage [0/1]>
The parameter is used to signal to Google whether or not cookies have been used while obtaining the event data. See below for the possible values of the gcs parameter and their meanings:
| Value | Meaning |
|---|---|
G100 |
Consent is denied for both ad_storage and analytics_storage. |
G110 |
Consent is granted for ad_storage and denied for analytics_storage. |
G101 |
Consent is denied for ad_storage and granted for analytics_storage. |
G111 |
Consent for both ad_storage and analytics_storage is granted. |
G1-- |
The site did not require consent for ad_storage or analytics_storage. |
According to Google, the functionality and the format of the
gcsquery parameter remain as is, and Google has planned no changes to the parameter format.
gcd parameter
The gcd parameter is the new kid on the block, as it has been introduced with Consent Mode v2. It is primarily used to communicate the current consent state for ad_user_data and ad_personalization to Google’s servers. But the parameter also contains the information about the consent state for ad_storage and analytics_storage:
11<ad_storage>1<analytics_storage>1<ad_user_data>1<ad_personalization>5
Furthermore, the gcd parameter contains information about the current state and whether or not the current state was obtained from a default or an update command or never has been actively set. To convey all of this information in a single parameter, Google uses a base64-encoded format, where each letter represents a specific consent state and command type:
| Letter | Description | Consent Status | Command Type | Example |
|---|---|---|---|---|
p |
All types are denied in only default setting | Denied | Default | l1p1p1p1p5 |
q |
All types are denied in default and update settings | Denied | Default & Update | l1q1q1q1q5 |
t |
All types are granted in only default setting | Granted | Default | l1t1t1t1t5 |
r |
All types are denied in default setting but are granted in update setting | Denied, then Granted | Default, then Update | l1r1r1r1r5 |
m |
All types are denied in only update setting (rare) | Denied | Update | l1m1m1m1m5 |
n |
All types are granted in only update setting (rare) | Granted | Update | l1n1n1n1n5 |
u |
All types are granted in default setting but are denied in update setting (rare) | Granted, then Denied | Default, then Update | l1u1u1u1u5 |
v |
All types are granted in default and update settings (rare) | Granted | Default & Update | l1v1v1v1v5 |
l |
Consent type is missing (indicates no Consent Mode setting) | Missing | None | l1l1l1l1l1 |
As you can see, the gcdparameter is as cryptic as it gets. But having an understanding of the parameter and its values is crucial for validating the Consent Mode v2 implementation.
Huge shoutout to Markus Baersch for deciperhing the
gcdparameter and making the information available to the community. For more information, see here.
Validating the Consent Mode v2 Implementation for
Lastly, let’s have a look at how to validate and debug the Consent Mode v2 implementation for Firebase SDK on different platforms. That much I can tell you already: it is a bit more straightforward than for web, as you can use the debug console of Xcode and Android Studio to verify the consent state.
iOS
You can verify that your consent settings are working as intended by viewing the Xcode debug console for your app. To do so, you follow these steps:
- Enable verbose logging on your device.
- In the Xcode debug console, look for the consent type names in console logs:
ad_storageanalytics_storagead_user_dataad_personalization
For example, if ad_storage are enabled, you’ll see the following message: “ad_storage is granted.””
Android
You can verify that your consent settings are working as intended by viewing the log messages for your app. To do so, you follow these steps:
- Enable verbose logging on your device.
- In the Android Studio logcat, find the log message that starts with “Setting consent”.
For example, if ad_storage is enabled, you’ll see the following log message:
Setting consent, ... AD_STORAGE=granted
Conclusion
In conclusion, the evolution of Consent Mode into its second iteration underlines its importance in ensuring the management of consent preferences for Google’s advertising universe.
It intends to allow users to navigate the digital space with increased autonomy, exercising more control over their data. Conversely, advertisers can benefit from a more refined approach to data collection that, if executed with precision and transparency. This can lead to a more trust-based relationship with their users.
The two new consent types introduced with Consent Mode v2 are mainly focused on controlling data activation processes, signaling a more granular level of data management for advertisers than ever before. The previously present consent types remain and focus on how the data is collected. The necessary adoption of Consent Mode v2 will be a manageable technical challenge for advertisers, as its implementation is relatively straightforward.
However, the introduction of Consent Mode v2 is not without its complexities (as indicated by the length of this blog post). As the advertising system created by Google and its legislation grows in sophistication, the burden of understanding and correctly implementing these new settings falls heavily on those who manage them – the advertisers.
MarTech providers such as Google should make it as simple as possible for advertisers to follow these standards – Google needs to give Consent Mode more love and work to do that.

")


")